


We’re not going to war with our fretboard (although it can sometimes feel that way), but we are going to see how we can make sense of the fretboard by learning its “anatomy”.
As I’ve mentioned before here and there, I struggled a lot with studying the fretboard when I was at the conservatory and I became obsessed with figuring out how to practice and study in an organized manner.
There’s a lot of information about the CAGED system or 3-notes-per-string or 2-notes-per-string or diagonal playing and repeating patterns or 2-1-2 arpeggios or or or…
The fretboard is a grid, a matrix.
You can divide it up in seemingly endless ways.
Hence my overwhelm when trying to study it.
Gotta learn all those arpeggios, scales, voicings in all keys in all possible modes and chord types… (just thinking about those days brings back the anxiety)
Over the years I’ve been able to piece things together and now I have come up with an organizational structure that can act as a “catch-all” system.
So, let me walk you through it.
(Most of this stuff you’ll probably have seen before, but I think you might find some helpful nuggets that fill in some gaps.)
Objective
Create a system to study the grid of the fretboard in an organized manner.
Why
Manage overwhelm
Remove guesswork
Restrictions
Strict position playing, i.e. 1st finger remains in the same position, no shifting
→ This means we will have a maximum of 3 notes per string
Step 1
Take a note, any note, say D.
Let’s locate every possible D we can find until it starts repeating itself again.

The circled numbers signify the strings, the roman numerals signify the position (i.e. III = 3rd position or 3rd fret).
If we connect them, we get this:

Step 2
Let’s see what happens if we start to form a major scale starting from each of them.
First we’ll go over the lower octave notes.
We’ll skip the use of open strings for now.

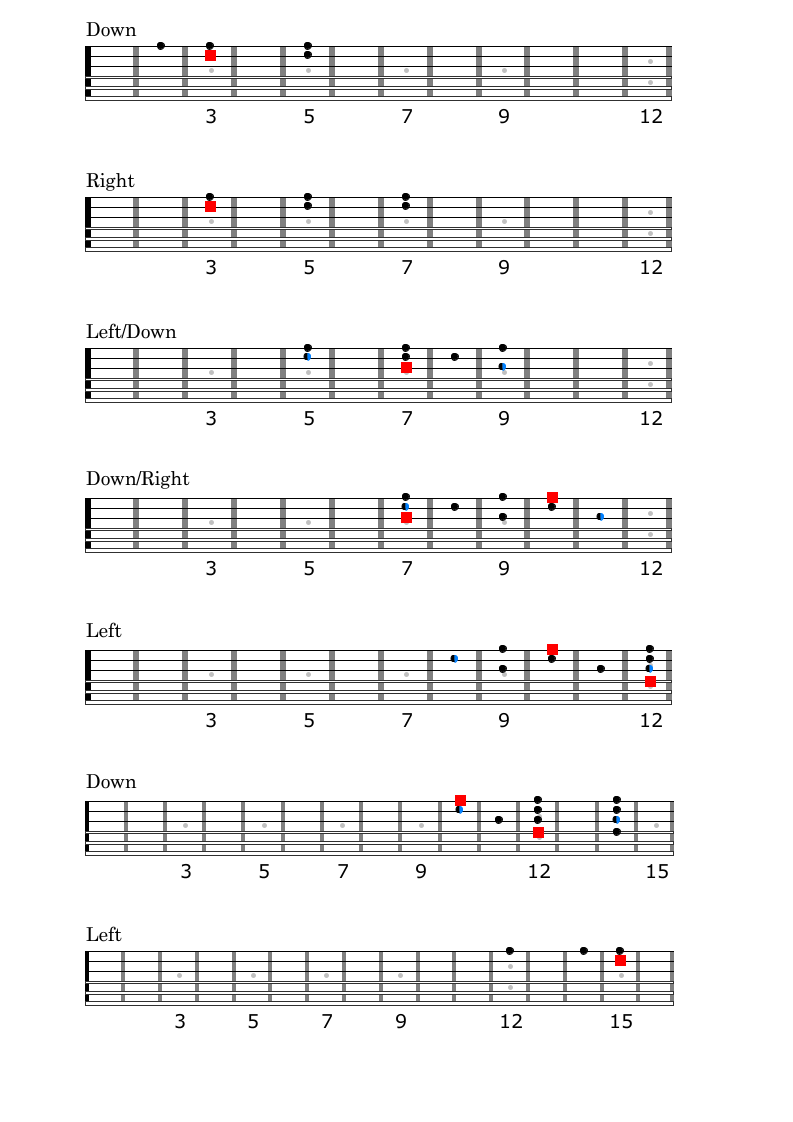
We end up with 7 different positions and 3 different "directions".
We either go “left”, “down” or “right” (shout-out to Rick Beato for that terminology and insight).
Step 3
Next we’ll do the upper octave.
Standard Tuning
Because of the way the guitar is tuned, our 2nd and 3rd string will have a “doubled” note, i.e. the same note appears on both the 2nd and 3rd string (colored in black/blue).
If we don’t double this note, we end up with a position shift.
This will also cause some “hybrid” directions such as left/down or down/right.
Step 4
Now we can put the upper octaves on top of the lower octaves.

If we complete our entire scale, we end up with 7 positions and we will have exhausted our options.

What we end up with is a 3 note-per-string “pattern”, with the 2nd and 3rd string having a doubled note.
You can do whatever you want with this.
I prefer to skip one of those and not double any notes, but I do know the doubled note is there.

These positions should be practiced daily, until the end of time (in my humble opinion).
Everything you practice can now be fitted within these positions and you can be rest assured that you'll have covered all of your options.
I found that for myself, focussing a disproportiante amount of time on these positions, it transfers over quite effortlessly to more horizontal playing.
You can download all of the images and files below: